
Finished project installation guide on Github
Web server anomaly detection Github page has full installation guide for manual and Docker installation. https://github.com/Dunttus/AI-Project/tree/master/install
Linux Ubuntu 18.04.4 LTS
In Ubuntu I started with “sudo apt-get update” ja “sudo apt-get upgrade” to get the new version information and install newer versions of the softwares on Ubuntu.
Docker installation OLD VERSION
NOTE! Nvidia container drivers are not supported by old versions of Docker requires 19.03+ version. Start installation from “Docker new version installation 19.03+”
I install docker with command “sudo apt-get install docker.io” and version check with “docker –version“
$ docker --version
Docker version 18.09.7, build 2d0083d
Docker New version installation 19.03+
Old docker installations “docker, docker-engine, docker.io, containerd and runc” need to be uninstalled and versions updated with “sudo apt-get update“.
I started by following instructions on Docker hubs guide with commands:
Command used bellow allows apt to install packages via HTTPS.
sudo apt-get install \
apt-transport-https \
ca-certificates \
curl \
gnupg-agent \
software-properties-common
Command bellow adds Dockers GPG-key to apt install.
curl -fsSL https://download.docker.com/linux/ubuntu/gpg | sudo apt-key add -
Command bellow adds Docker.com custom packages to apt’s package management.
sudo add-apt-repository \
"deb [arch=amd64] https://download.docker.com/linux/ubuntu \
$(lsb_release -cs) \ stable"
Command bellow updates Ubuntu version information.
sudo apt-get update
Command bellow installs docker-ce docker-ce-cli ja containerd.io packages
sudo apt-get install -y docker-ce docker-ce-cli containerd.io
Command bellow shows Docker version information.
$ docker --version
Docker version 19.03.6, build 369ce74a3c
Docker Containers
Tensorflows own page has a set of instructions for installing the container. Container includes Tensorflown, Nvidia Cuda, Python and Jupyter Notebook. Container is created with Commands:
## Retrieves dependencies through the docker hub for your machine.
sudo docker pull tensorflow/tensorflow:latest-gpu-jupyter
## Installs the container with presets
sudo docker run -it -p 8888:8888 tensorflow/tensorflow:nightly-py3-jupyte
The Docker container is opened from a local machine with a browser on the page: http://localhost:8888.
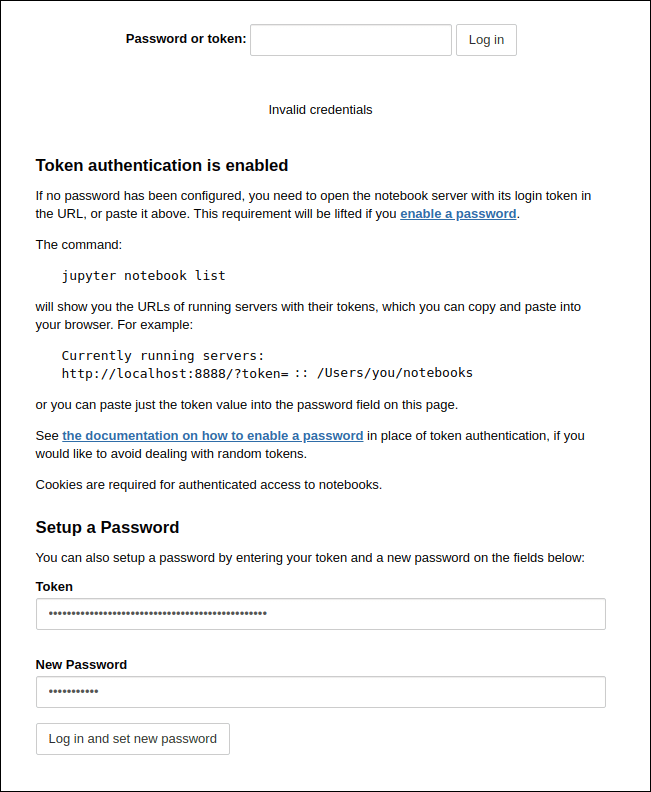
The container has a premade authentication method. You will need a “Token” value to log in to the container or to create a new password. The value of the token can be found as shown in the picture below.

Logged in to the container and open New -> Python3, which opens the Python3 interpreter in Jupyter. First, I looked at whether the container was made for CUDA tools -> yes it was. Then I looked to see if the Jupyter notebook can recognize my graphics card, that reported an empty object []. So, its possibly not recognizing the graphics card.
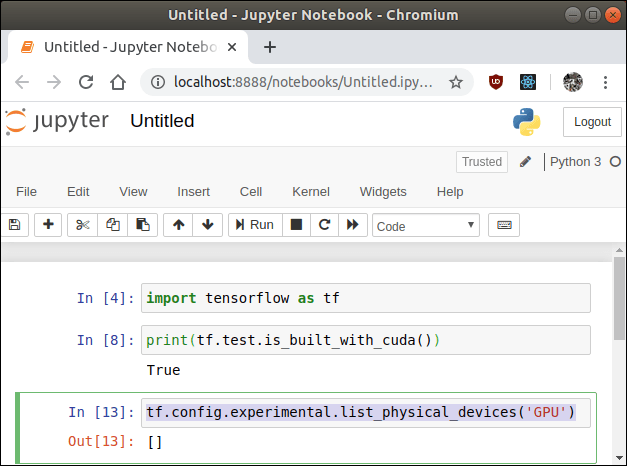
I looked at the terminal where the container is open and found a more specific message: “tensorflow/stream_executor/cuda/cuda_diagnostics.cc:163] no NVIDIA GPU device is present: /dev/nvidia0 does not exist” So, you we still need Nvidia’s own drivers for Docker, which will route Nvidia’s drivers to containers.
We can still try if Ubuntu recognizes the graphics card with the command “ lspci | grep -i nvidia“, which recognized the display driver from the local machine just fine.
$ lspci | grep -i nvidia
26:00.0 VGA compatible controller: NVIDIA Corporation GP107 [GeForce GTX 1050 Ti] (rev a1)
26:00.1 Audio device: NVIDIA Corporation GP107GL High Definition Audio Controller (rev a1)
Nvidian Docker drivers installation
First, we check that the drivers are found on your local machine by command “nvidia.smi“.

If you can’t find the drivers on your machine, download them because the container uses local user drivers.
I started with Nvidia Github pages commands in section “Ubuntu 16.04/18.04, Debian Jessie/Stretch/Buster”, commands will install the Nvidian container tools.
distribution=$(. /etc/os-release;echo $ID$VERSION_ID)

curl -s -L https://nvidia.github.io/nvidia-docker/gpgkey | sudo apt-key add -

curl -s -L https://nvidia.github.io/nvidia-docker/$distribution/nvidia-docker.list | sudo tee /etc/apt/sources.list.d/nvidia$

sudo apt-get update && sudo apt-get install -y nvidia-container-toolkit

sudo systemctl restart docker
Then install Nvidia add-on on Docker by following Nvidia’s own Github pages instructions from section ”Installing Version 2.0”.
## Update Ubuntu version information.
sudo apt-get update
## Installs the Nvidia Add-on for Docker.
sudo apt-get install -y nvidia-docker2
## The Dockerd process must be terminated since it defaults to CPU drivers.
sudo pkill -SIGHUP dockerd
Then reopen the Tensorflown container using the Nvidia drivers with the command:
sudo docker run --runtime=nvidia -v -it -p 8888:8888 tensorflow/tensorflow:latest-gpu-py3-jupyter
I opened the container from http://localhost:8888 and logged in with a new Token I opened the Python3 interpreter -> I brought the Tensorflow library -> I checked if Tensorflow was made to support CUDA –> yes it was. Then checked if Tensorflow recognizes the display drivers. Now by default, everything seems to work with the graphics card drivers.
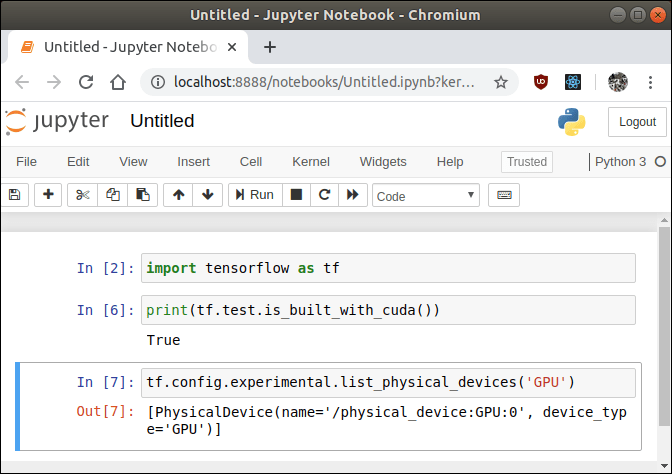
Just to be sure I checked container terminal messages and found: “tensorflow/core/common_runtime/gpu/gpu_device.cc:1555] Found device 0 with properties: pciBusID: 0000:26:00.0 name: GeForce GTX 1050 Ti computeCapability: 6.1” which recognized graphics card by name.
Docker container with local folder “jupytersave” where all files are saved even if container is deleted:
sudo docker run --runtime=nvidia --rm -v /home/USER/jupytersave:/tf -p 8888:8888 tensorflow/tensorflow:latest-gpu-py3-jupyter
Sources
Tensorflow docker: https://www.tensorflow.org/install/docker
Supported CUDA versions: https://gitlab.com/nvidia/container-images/cuda/blob/master/doc/supported-tags.$
Docker install: https://docs.docker.com/install/linux/docker-ce/ubuntu/
Nvidia docker install: https://github.com/NVIDIA/nvidia-docker/wiki/Installation-(version-2.0)#ubuntu-distributions-1
Windows 10 Pro 1809
Nvidia Drivers
First you need the graphics card drivers. If you do not know your Graphics card model it can be found in Windows by searching for dxdiag.
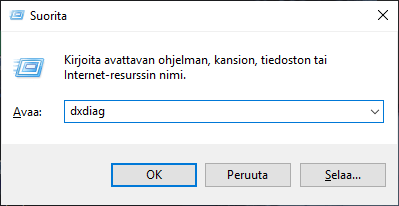
To open the DxDiag program in Windows, press the “WINDOWS + R” keys at the same time, which will open the execute program screen. In the text box I typed dxdiag and pressed OK.
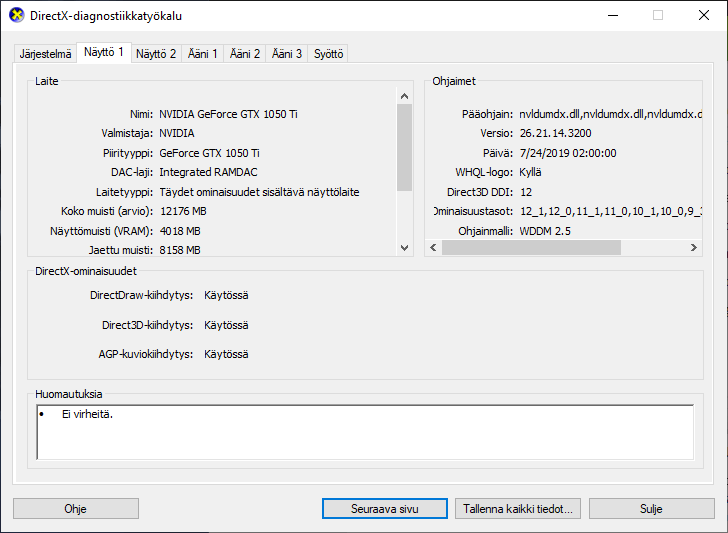
The graphics card model can be found under Display 1 and under the chip type, the GeForce GTX 1050 Ti.
If your own updates to Windows have not yet downloaded the drivers for your graphics card, you can find them on the page: https://www.nvidia.com/Download/index.aspx.
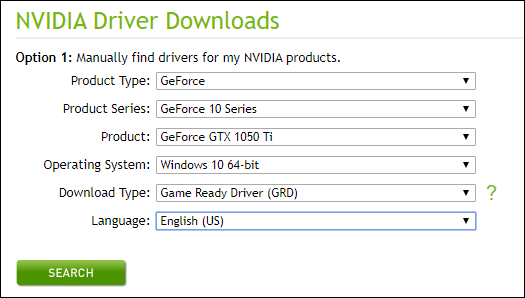
Select your settings:
- Product Type: GeForce – brand name.
- Product Series: GeFrorce 10 Series – product line beginning numbers.
- Product: GeForce GTX 1050 Ti – the full product name.
- Operationg System: Windows 10 64-bit – operating system.
- Download Type: Game Ready Driver (GRD) – game ready drivers.
- Lanquage: English (US) – installation language.
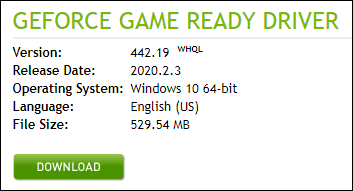
I downloaded the installer, installed the .exe file on my computer and restarted my computer.
Nvidia CUDA Toolkit
Nvidia’s CUDA Toolkit is still needed to teach machine learning models, which allow you to use the power of computing power of your graphics card for machine learning.
Install CUDA drivers from the Nvidia developer page: https://developer.nvidia.com/cuda-downloads.
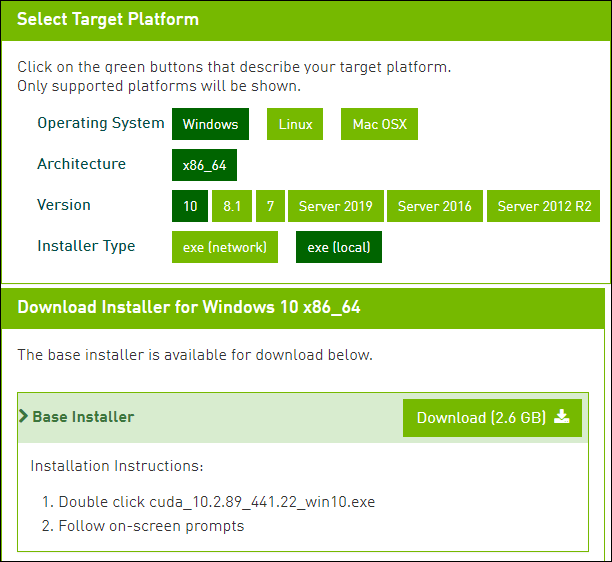
Select your settings:
- Operating system: Windows – operating system.
- Architecture: x86_64 – operating system bit version 64.
- Version: 10 – Windows version.
- Installer Type: exe (local) – local .exe file.
The page selects the correct driver by pressing the Download button, which downloaded the installer and then I installed the .exe file on my own machine.
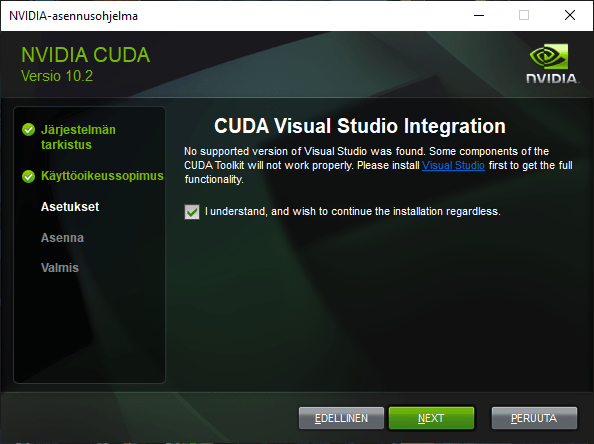
The installer asks me to install Visual Studio because it uses the C language compiler library through it, so I gave the installer permission to install Visual Studio packages as well.

Nvidia CudNN
Downloading CUDA Add-on Enhance Machine Learning Accelerator To download the CudNN Add-on, it requires a login and it took about 5mins to create a new Nvidia developer user. The download page prompts you to log in to the Nvidias page: https://developer.nvidia.com/rdp/cudnn-download.
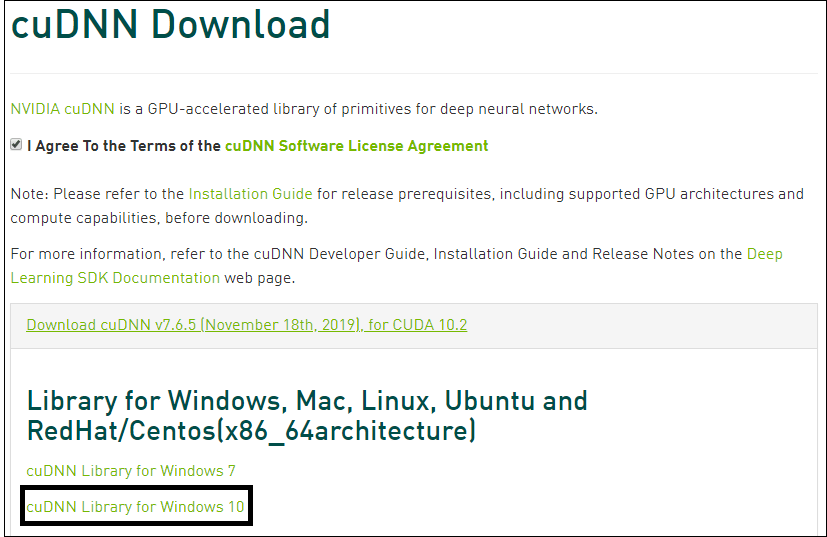
After logging in, the cuDNN plugin can be downloaded by first pressing the open version to make sure it is the same as the CUDA version eg 10.2 then selecting the operating system version that loads the .zip folder. After extracting the zip file to a normal folder.

From the downloaded folder \cuda\bin\ moving the file cudnn64_7.dll CUDAN to the folder C:\Program Files\NVIDIA GPU Computing Toolkit\CUDA\v10.2\bin.
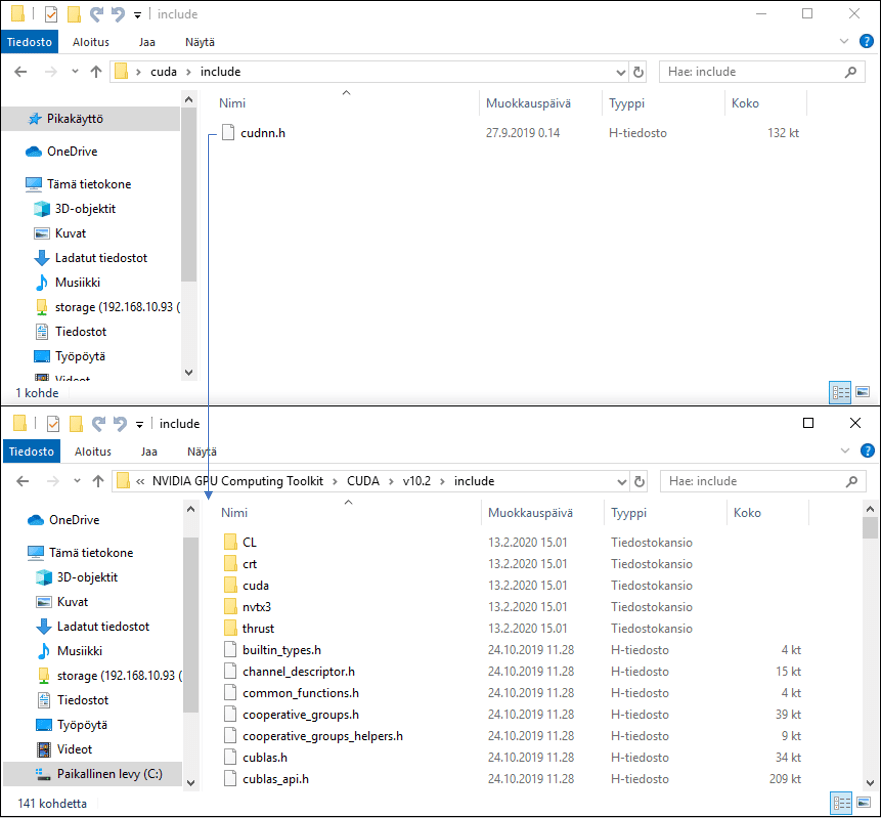
From folder \cuda\include file cudnn.h CUDAN to folder C:\Program Files\NVIDIA GPU Computing Toolkit\CUDA\v10.2\include.

From folder \cuda\lib\x64 file cudnn.lib CUDAN to folder C:\Program Files\NVIDIA GPU Computing Toolkit\CUDA\v10.2\, all three files are moved to the CUDA folders to make the plugin work.
Machine Learning Softwares
Docker
Note! Nvidia containers does not have support for Windows operating systems, because Nvidia does not have a Windows compatible containers source: https://github.com/NVIDIA/nvidia-docker/issues/429. In Windows you need to install programs manually to use GPU. Go to Manual Installation part.
Note. This Docker Installation Guide only works on Windows Pro or higher and only support CPU processing.
The software is downloaded as a ready container by the Github user petronetto page that is, we need a container for our environment. To download Docker for Windows, you need the Docker Download page: https://hub.docker.com/?overlay=onboarding.
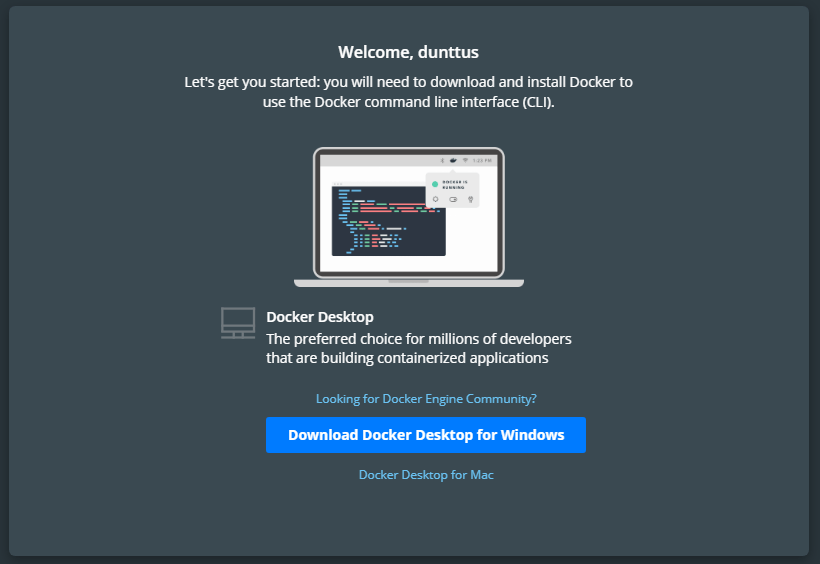
Button “Download Docker Desktop for Windows” installs the Docker Desktop Installer.exe file on your computer. I ran Docker Desktop Installer.exe and restarted my computer. I did not turn on Hyper-V Windows features during installation because I will be using VirtualBox.
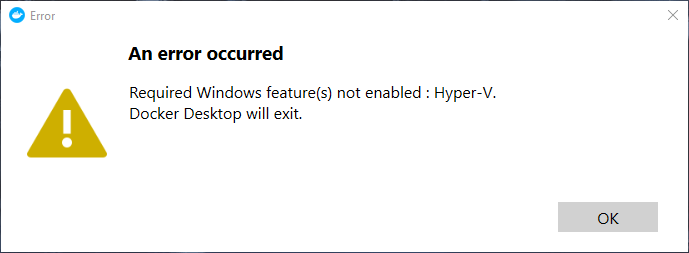
At reboot, Docker Desktop announces that Hyper-V is required for the docker desktop to work, but we do not access Docker through it.
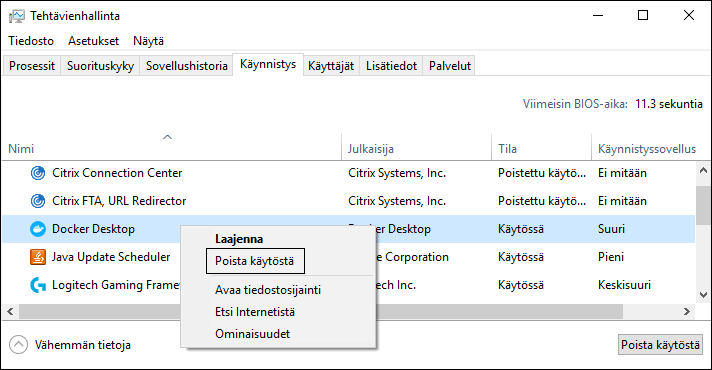
I removed Docker Desktop from starting up programs, now it doesn’t appears at startup.
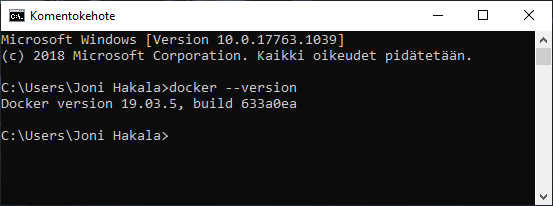
Now the docker frame is loaded version can be checked cmd command “docker –version“.
Then we download additional components into Docker to control containers in the Bash terminal on Windows. I downloaded DockerToolbox.exe from the page: https://docs.docker.com/v17.12/toolbox/toolbox_install_windows/
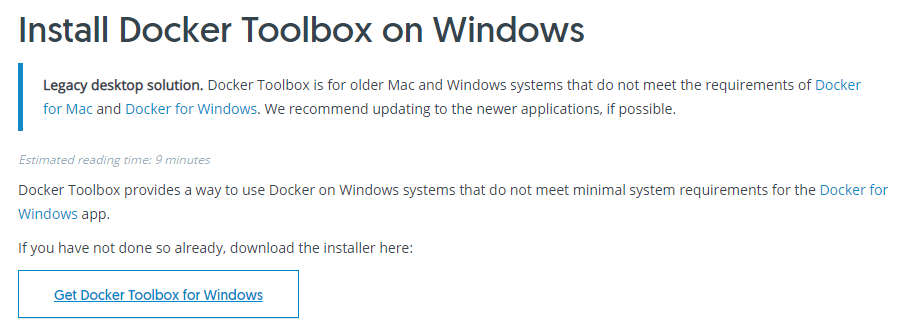
I installed DockerToolbox.exe and opened Docker Quickstart Terminal, which opens the terminal control to Docker.
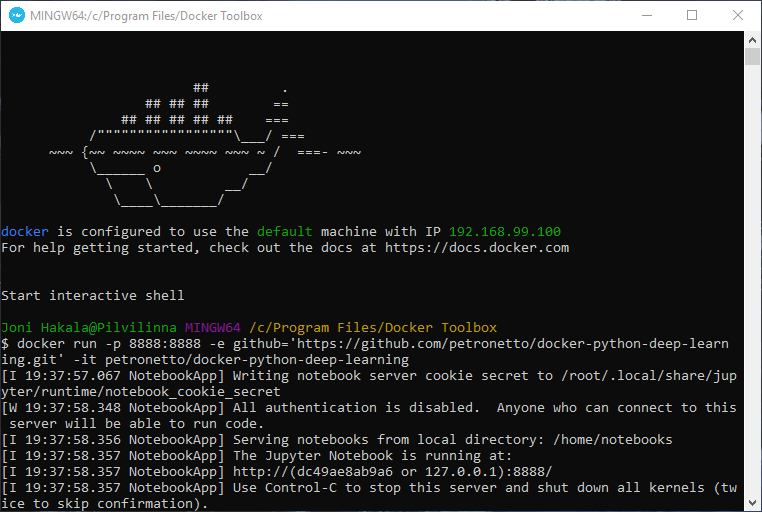
I wrote a command to the terminal “docker run -p 8888:8888 -e github=’https://github.com/petronetto/docker-python -deep-learning.git’ -it petronetto/docker-python-deep-learning“, which pulls directly from the Github page to create a container. The container is hosted in VirtuaBox, which came with DockerTools.
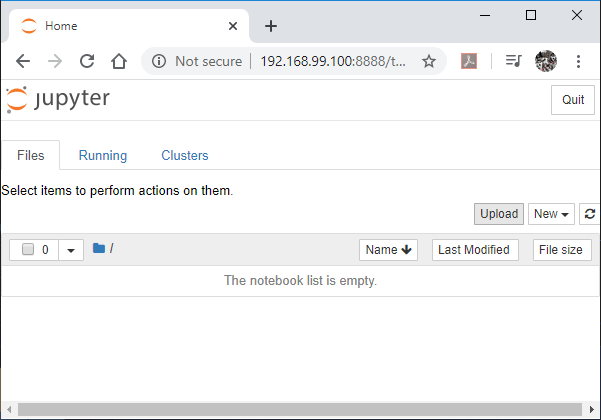
Jupyter opened to the address of the container, which works by default and even though the container setup warns “All authentication is disabled. the container does not even appear on the internal network because it creates a new subnet address that is behind the firewall on this machine.
Environmental testing
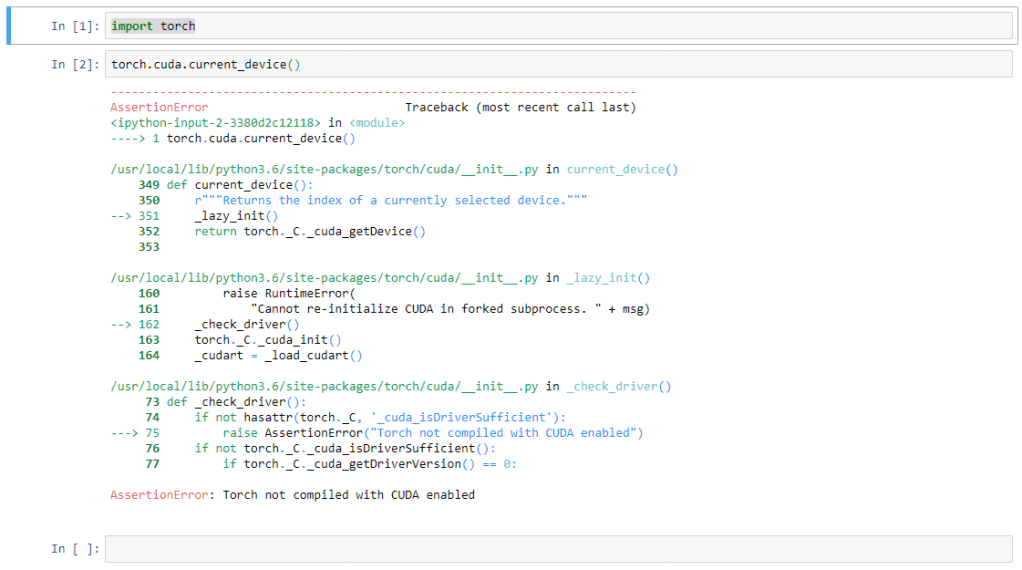
I brought Jupyter to the Torch Library and tried out the functionality of CUDA, which wasn’t working yet. I tried to find a way to get CUDAN to work but probably can’t make it work on Windows in a container because Nvidia doesn’t have a Windows compatible container.
Note! Nvidia containers does not have support for Windows operating systems, because Nvidia does not have a Windows compatible containers source: https://github.com/NVIDIA/nvidia-docker/issues/429. In Windows you need to install programs manually to use GPU. Go to Manual Installation part.
Manual Installation
For environment to work with GPU make sure you have right versions of Tensorflow, CUDA, CudNN and GPU drivers check versions from Tensorflows site: https://www.tensorflow.org/install/gpu. Also, you will need all environment paths in Control Panel \ System and Security \ System \ System Properties \ environment variables.
C:\Program Files\NVIDIA GPU Computing Toolkit\CUDA\v10.1\binC:\Program Files\NVIDIA GPU Computing Toolkit\CUDA\v10.1\extras\CUPTI\libx64C:\Program Files\NVIDIA GPU Computing Toolkit\CUDA\v10.1\include
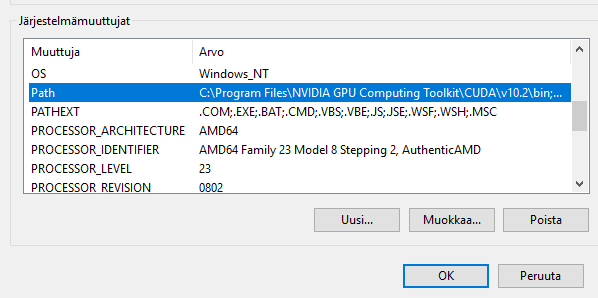
Select Path and edit to open path environment variables.
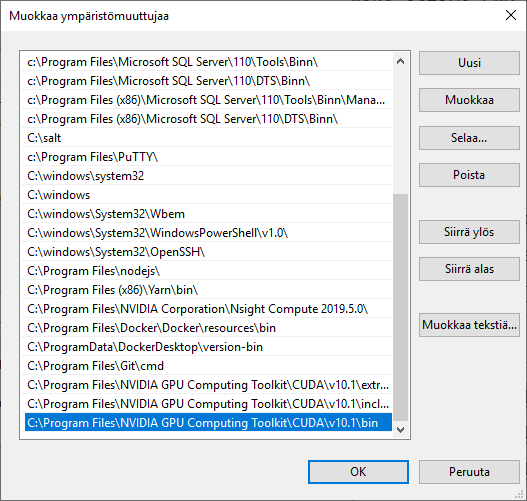
Add new variables from new and make sure you have this exact path in your computer.
MiniConda
MiniConda is terminal version of Anaconda. I installed MiniConda from Conda.io site for Windows 64-bit. Installed MiniConda from .exe file and added environment PATH and registered my default Python as Miniconda3.

After installing MiniConda I open Windows CMD and install software i needed with Conda commands:
# Installs jupyter notebook.
conda install jupyter
# Install tensorflow.
conda install tensorflow
# Making tensorflow instance with GPU.
conda create -n tensorflow_gpuenv tensorflow-gpu
# Make active CMD to send commands to instance.
conda activate tensorflow_gpuenv
# Open Tensorflow instance with jupyter.
jupyter notebook
Sources:
Docker Tools: https://docs.docker.com/v17.12/toolbox/toolbox_install_windows/
NVIDIA drivers: https://www.nvidia.com/Download/index.aspx
CUDA drivers https://developer.nvidia.com/cuda-downloads
CudNN drivers: https://developer.nvidia.com/rdp/cudnn-download
Docker Desktop: https://hub.docker.com/?overlay=onboarding
Docker container creation: https://github.com/petronetto/docker-python-deep-learning
CudNN installation: https://docs.nvidia.com/deeplearning/sdk/cudnn-install/index.html
CUDA container Windows problem: https://github.com/NVIDIA/nvidia-docker/issues/429
Manual install Windows: https://www.tensorflow.org/install/gpu
